Installation
Warning
The instructions on Safety related to the rc_cube must be read and understood prior to installation.
The rc_cube offers multiple Gigabit Ethernet interfaces:
- One interface labeled “external” for connecting the device to a local computer network, and
- up to four interfaces labeled “sensor<N>” for connecting one or more 3D cameras such as for example the rc_visard sensor (see Connection of cameras).
All other Ethernet ports are disabled.
For commissioning, operation, or troubleshooting the user can connect input devices such as a mouse and a keyboard as well as a computer screen directly to the rc_cube. However, this is optional as the functionality of the rc_cube is fully accessible via the local network it is connected to.
Note
If a screen is used on the rc_cube, it must be connected before booting, or the rc_cube must be restarted to activate the screen.
Software license
Every rc_cube device ships with a USB dongle for licensing and protection of the installed software packages. The purchased software licenses are installed on and are bound to this dongle and its ID.
The functionality of the rc_cube can be enhanced anytime by upgrading the license, e.g., for optionally available software modules.
Note
The rc_cube requires to be rebooted whenever the installed licenses have changed.
Note
The dongle ID and the license status can be retrieved via the rc_cube’s various interfaces such as the page of the Web GUI.
Note
For the software components to be properly licensed, the USB dongle must be plugged to the rc_cube before power up.
Note
The rc_cube requires to be rebooted, whenever the license dongle is plugged to or unplugged from the device.
Power up
Note
The rc_cube I does not come with a power supply. A separate 24V/20Amp (e.g. top hat rail) power supply is required.
The rc_cube is booted by using the power switch on the device. If a computer screen is connected it will display the rc_cube’s Web GUI when the boot process is finished.
Note
For successful operation please make sure that the rc_visard being connected to the rc_cube is powered and booted.
Discovery of rc_cube devices
Roboception rc_cube devices that are powered up and connected to the local network or directly to a computer can be found using the standard GigE Vision® discovery mechanism.
Roboception offers the open-source tool rcdiscover-gui, which can be downloaded free of charge from
https://github.com/roboception/rcdiscover/releases for Windows and Linux.
The tool’s Windows version consists of a single executable for Windows 7, 10 and 11, which can be executed without installation.
For Linux an installation package is available for Ubuntu.
At startup, all available GigE Vision® devices – including rc_cube devices – are listed with their names, serial numbers, current IP addresses, and unique MAC addresses. The discovery tool finds all devices reachable by global broadcasts. Misconfigured devices that are located in different subnets than the application host may also be listed. A tickmark in the discovery tool indicates whether devices are actually reachable via a web browser.
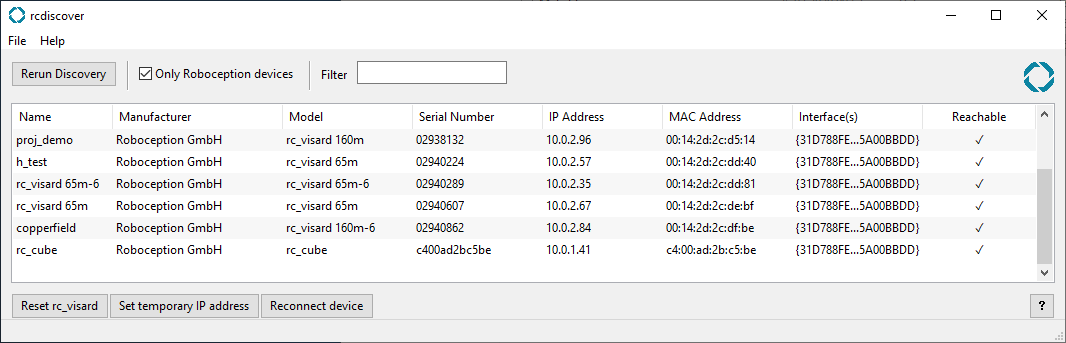
Fig. 2 rcdiscover-gui tool for finding connected GigE Vision® devices
After successful discovery, a double click on the device row opens the Web GUI of the device in the operating system’s default web browser. Google Chrome or Mozilla Firefox are recommended as web browser.
Resetting configuration
Note
The rcdiscover-gui resetting mechanism is currently not implemented for rc_cube devices.
Network configuration
The rc_cube requires an Internet Protocol (IP) address for communication with other network devices. The IP address must be unique in the local network, and can be set either manually via a user-configurable persistent IP address, or automatically via DHCP. If none of these IP configuration methods apply, the rc_cube falls back to a Link-Local IP address.
The network settings of the rc_visard that is used in combination with the rc_cube are automatically configured when the rc_visard is connected to the rc_cube.
Note
To not conflict with the internal network between the rc_cube and
the connected rc_visard, the IP address assigned to the rc_cube in the
local network must not be in the range of 172.23.42.0/24 and 172.17.0.0/16.
Following the GigE Vision® standard, the priority of IP configuration methods on the rc_cube is
- Persistent IP (if enabled)
- DHCP (if enabled)
- Link-Local
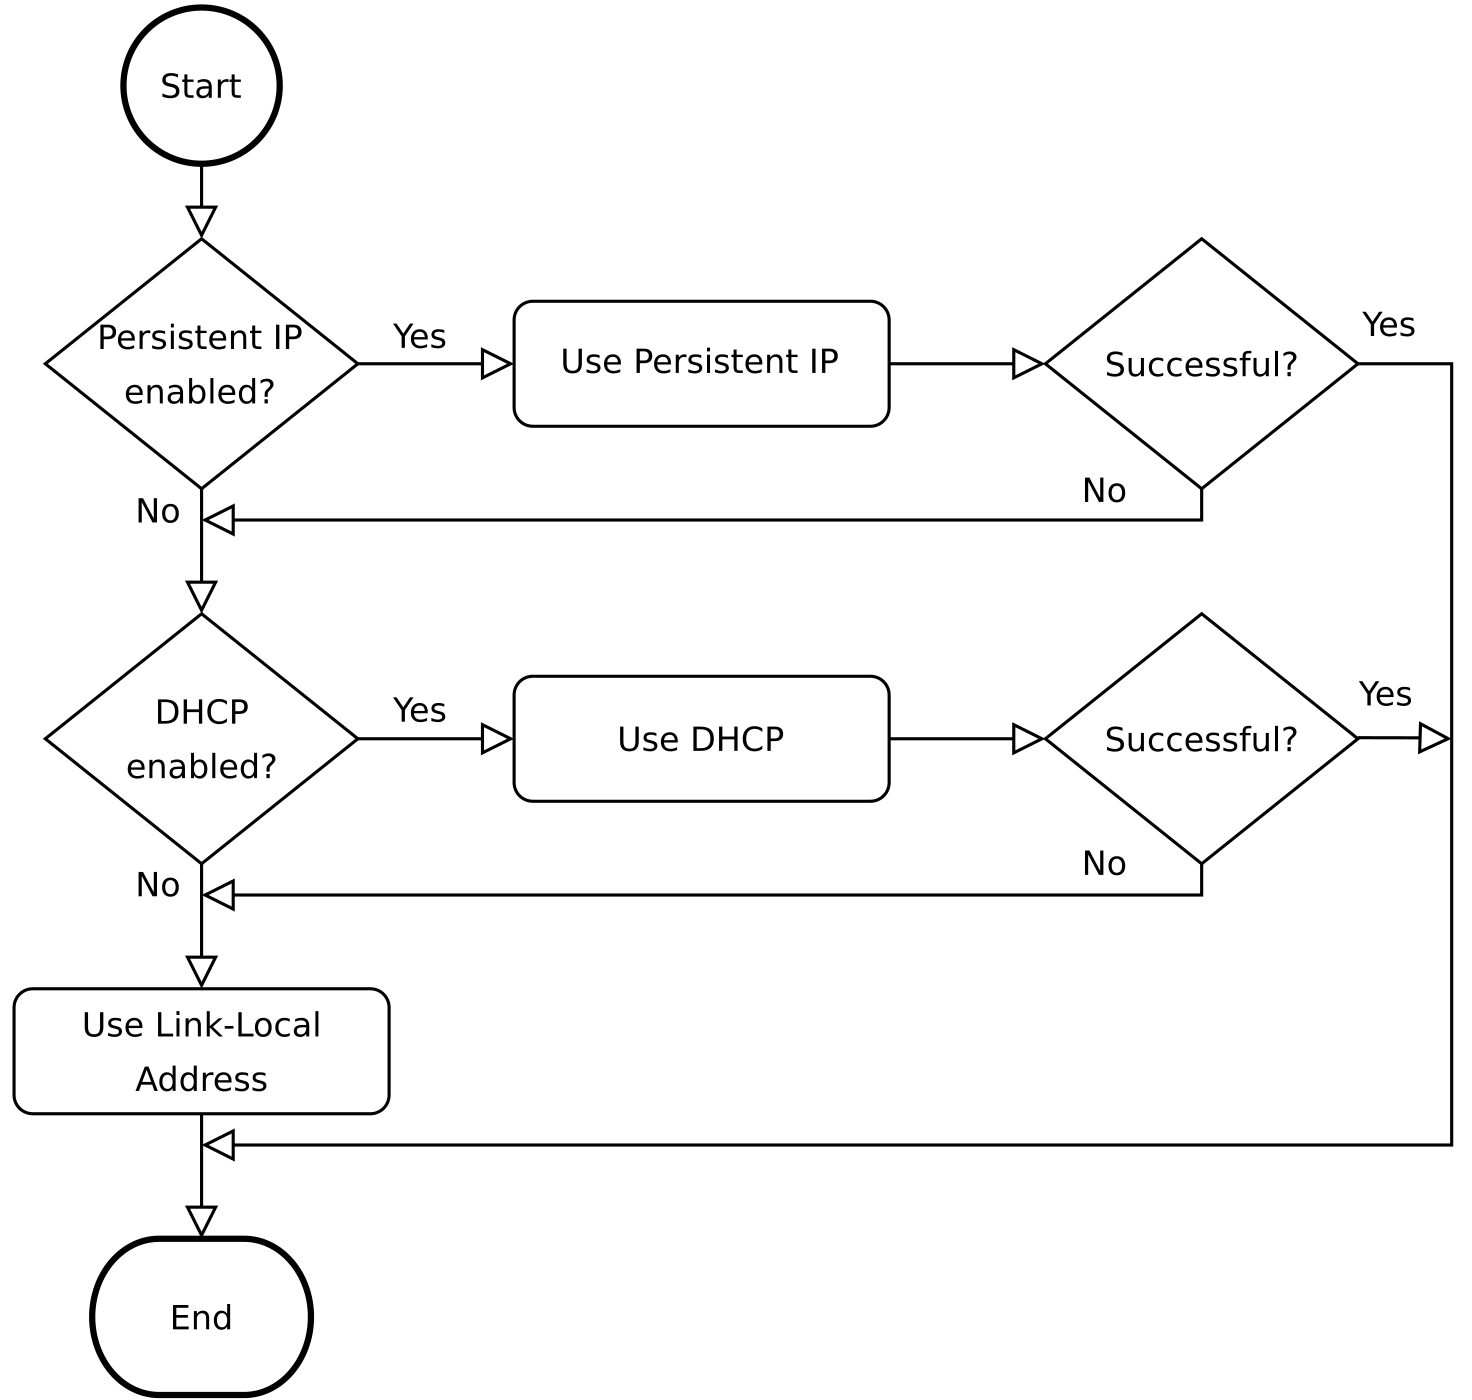
Fig. 3 rc_cube’s IP configuration method selection flowchart
Options for changing the rc_cube’s network settings and IP configuration are:
- the page of the rc_cube’s Web GUI – if it is reachable in the local network already, see Web GUI
- any configuration tool compatible with GigE Vision® 2.0, or Roboception’s command-line tool
gc_config. Typically, these tools scan for all available GigE Vision® devices on the network. All rc_cube devices can be uniquely identified by their serial number and MAC address, which are both printed on the device.- temporarily changing or completely resetting the rc_cube’s network configuration via Roboception’s
rcdiscover-guitool, see Discovery of rc_cube devices
Note
The command-line tool gc_config is part of Roboception’s open-source convenience layer rc_genicam_api,
which can be downloaded free of charge for Windows and Linux from http://www.roboception.com/download.
Host name
The rc_cube’s host name is based on its serial number, which is printed on the device, and
is defined as rc-cube-<serial number>.
Automatic configuration (factory default)
The Dynamic Host Configuration Protocol (DHCP) is preferred for setting an IP address. If DHCP is active on the rc_cube, which is the factory default, the device tries to contact a DHCP server at startup and every time the network cable is being plugged in. If a DHCP server is available on the network, the IP address is automatically configured.
In some networks, the DHCP server is configured so that it only accepts known devices. In this case, the Media Access Control address (MAC address), which is printed on the device label, needs to be configured in the DHCP server. At the same time, the rc_cube’s host name can also be set in the Domain Name Server (DNS). Both MAC address and host name should be sent to the network administrator for configuration.
If the rc_cube cannot contact a DHCP server within about 15 seconds after startup, or after plugging in the network cable, it assigns itself a unique IP address. This process is called Link-Local. This option is especially useful for connecting the rc_cube directly to a computer. The computer must be configured for Link-Local as well. Link-Local might already be configured as a standard fallback option, as it is under Windows 10. Other operating systems such as Linux require Link-Local to be explicitly configured in their network managers.
Manual configuration
Specifying a persistent, i.e. static IP address manually might be useful in some cases. This address is stored on the rc_cube to be used on device startup or network reconnection. Please make sure the selected IP address, subnet mask and gateway will not cause any conflicts on the network.
Warning
The IP address must be unique within the local network and within the local network’s range of valid addresses. Furthermore, the subnet mask must match the local network; otherwise, the rc_cube may become inaccessible. This can be avoided by using automatic configuration as explained in Automatic configuration (factory default).
If this IP address cannot be assigned, e.g. because it is already used by another device in the network, IP configuration will fall back to automatic configuration via DHCP (if enabled) or a Link-Local address.
Connection of cameras
Depending on the rc_cube model, two or more 3D cameras can be connected to the Ethernet ports labelled sensor0, sensor1, etc.
The rc_cube S has one 2.5 Gigabit Ethernet port for connecting up to two sensors, e.g.
- connecting one rc_visard or zivid without additional hardware
- connecting two rc_visard or zivid devices via a separate 2.5Gbit switch
- connecting one rc_viscore or Stereo ace via a separate 2.5Gbit switch
- connecting one blaze via a separate 2.5Gbit switch
The rc_cube I has four 1 Gigabit Ethernet ports for connecting up to four sensors, e.g.
- connecting up to four rc_visard or zivid devices without additional hardware
- connecting up to two rc_viscore or Stereo ace devices without additional hardware
- connecting up to two blaze sensors devices without additional hardware
It is also possible to connect 3D cameras of different types to an rc_cube, if the number of Ethernet ports permits. However, the rc_cube S cannot process more than two sensors at the same time, the rc_cube I not more than four.
Warning
The rc_viscore, Basler Stereo ace or Basler blaze camera must not be connected via a 1Gbit switch or slower, as this leads to severe loss of images.
The rc_cube offers up to four software camera pipelines for processing data from the connected sensors. The configuration of the camera pipelines is explained in Camera pipelines.
Basler blaze sensors
After connecting the Basler blaze sensor, it can take up to about one minute until it is found. Upon first connection of the sensor to the rc_cube, the sensor must be calibrated before it can be used. Calibration can be done through the Web GUI on the page Camera calibration under Configuration in the respective pipeline. After storing the calibration, it will persistently reside on the rc_cube and automatically be used whenever the sensor is connected to the rc_cube again, regardless of the port or pipeline.