TagDetect
Introduction
The TagDetect components run on board the rc_cube and allow the detection of 2D bar codes and tags. Currently, there are TagDetect components for QR codes and AprilTags. The components, furthermore, compute the position and orientation of each tag in the 3D camera coordinate system, making it simple to manipulate a tag with a robot or to localize the camera with respect to a tag.
Tag detection is made up of three steps:
- Tag reading on the 2D image pair (see Tag reading).
- Estimation of the pose of each tag (see Pose estimation).
- Re-identification of previously seen tags (see Tag re-identification).
In the following, the two supported tag types are described, followed by a comparison.
QR code
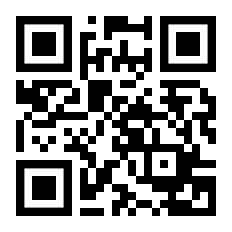
Fig. 23 Sample QR code
QR codes are two-dimensional bar codes that contain arbitrary user-defined data. There is wide support for decoding of QR codes on commodity hardware such as smartphones. Also, many online and offline tools are available for the generation of such codes.
The “pixels” of a QR code are called modules. Appearance and resolution of QR codes change with the amount of data they contain. While the special patterns in the three corners are always 7 modules wide, the number of modules between them increases the more data is stored. The lowest-resolution QR code is of size 21x21 modules and can contain up to 152 bits.
Even though many QR code generation tools support generation of specially designed QR codes (e.g., containing a logo, having round corners, or having dots as modules), a reliable detection of these tags by the rc_cube’s TagDetect component is not guaranteed. The same holds for QR codes which contain characters that are not part of regular ASCII.
AprilTag
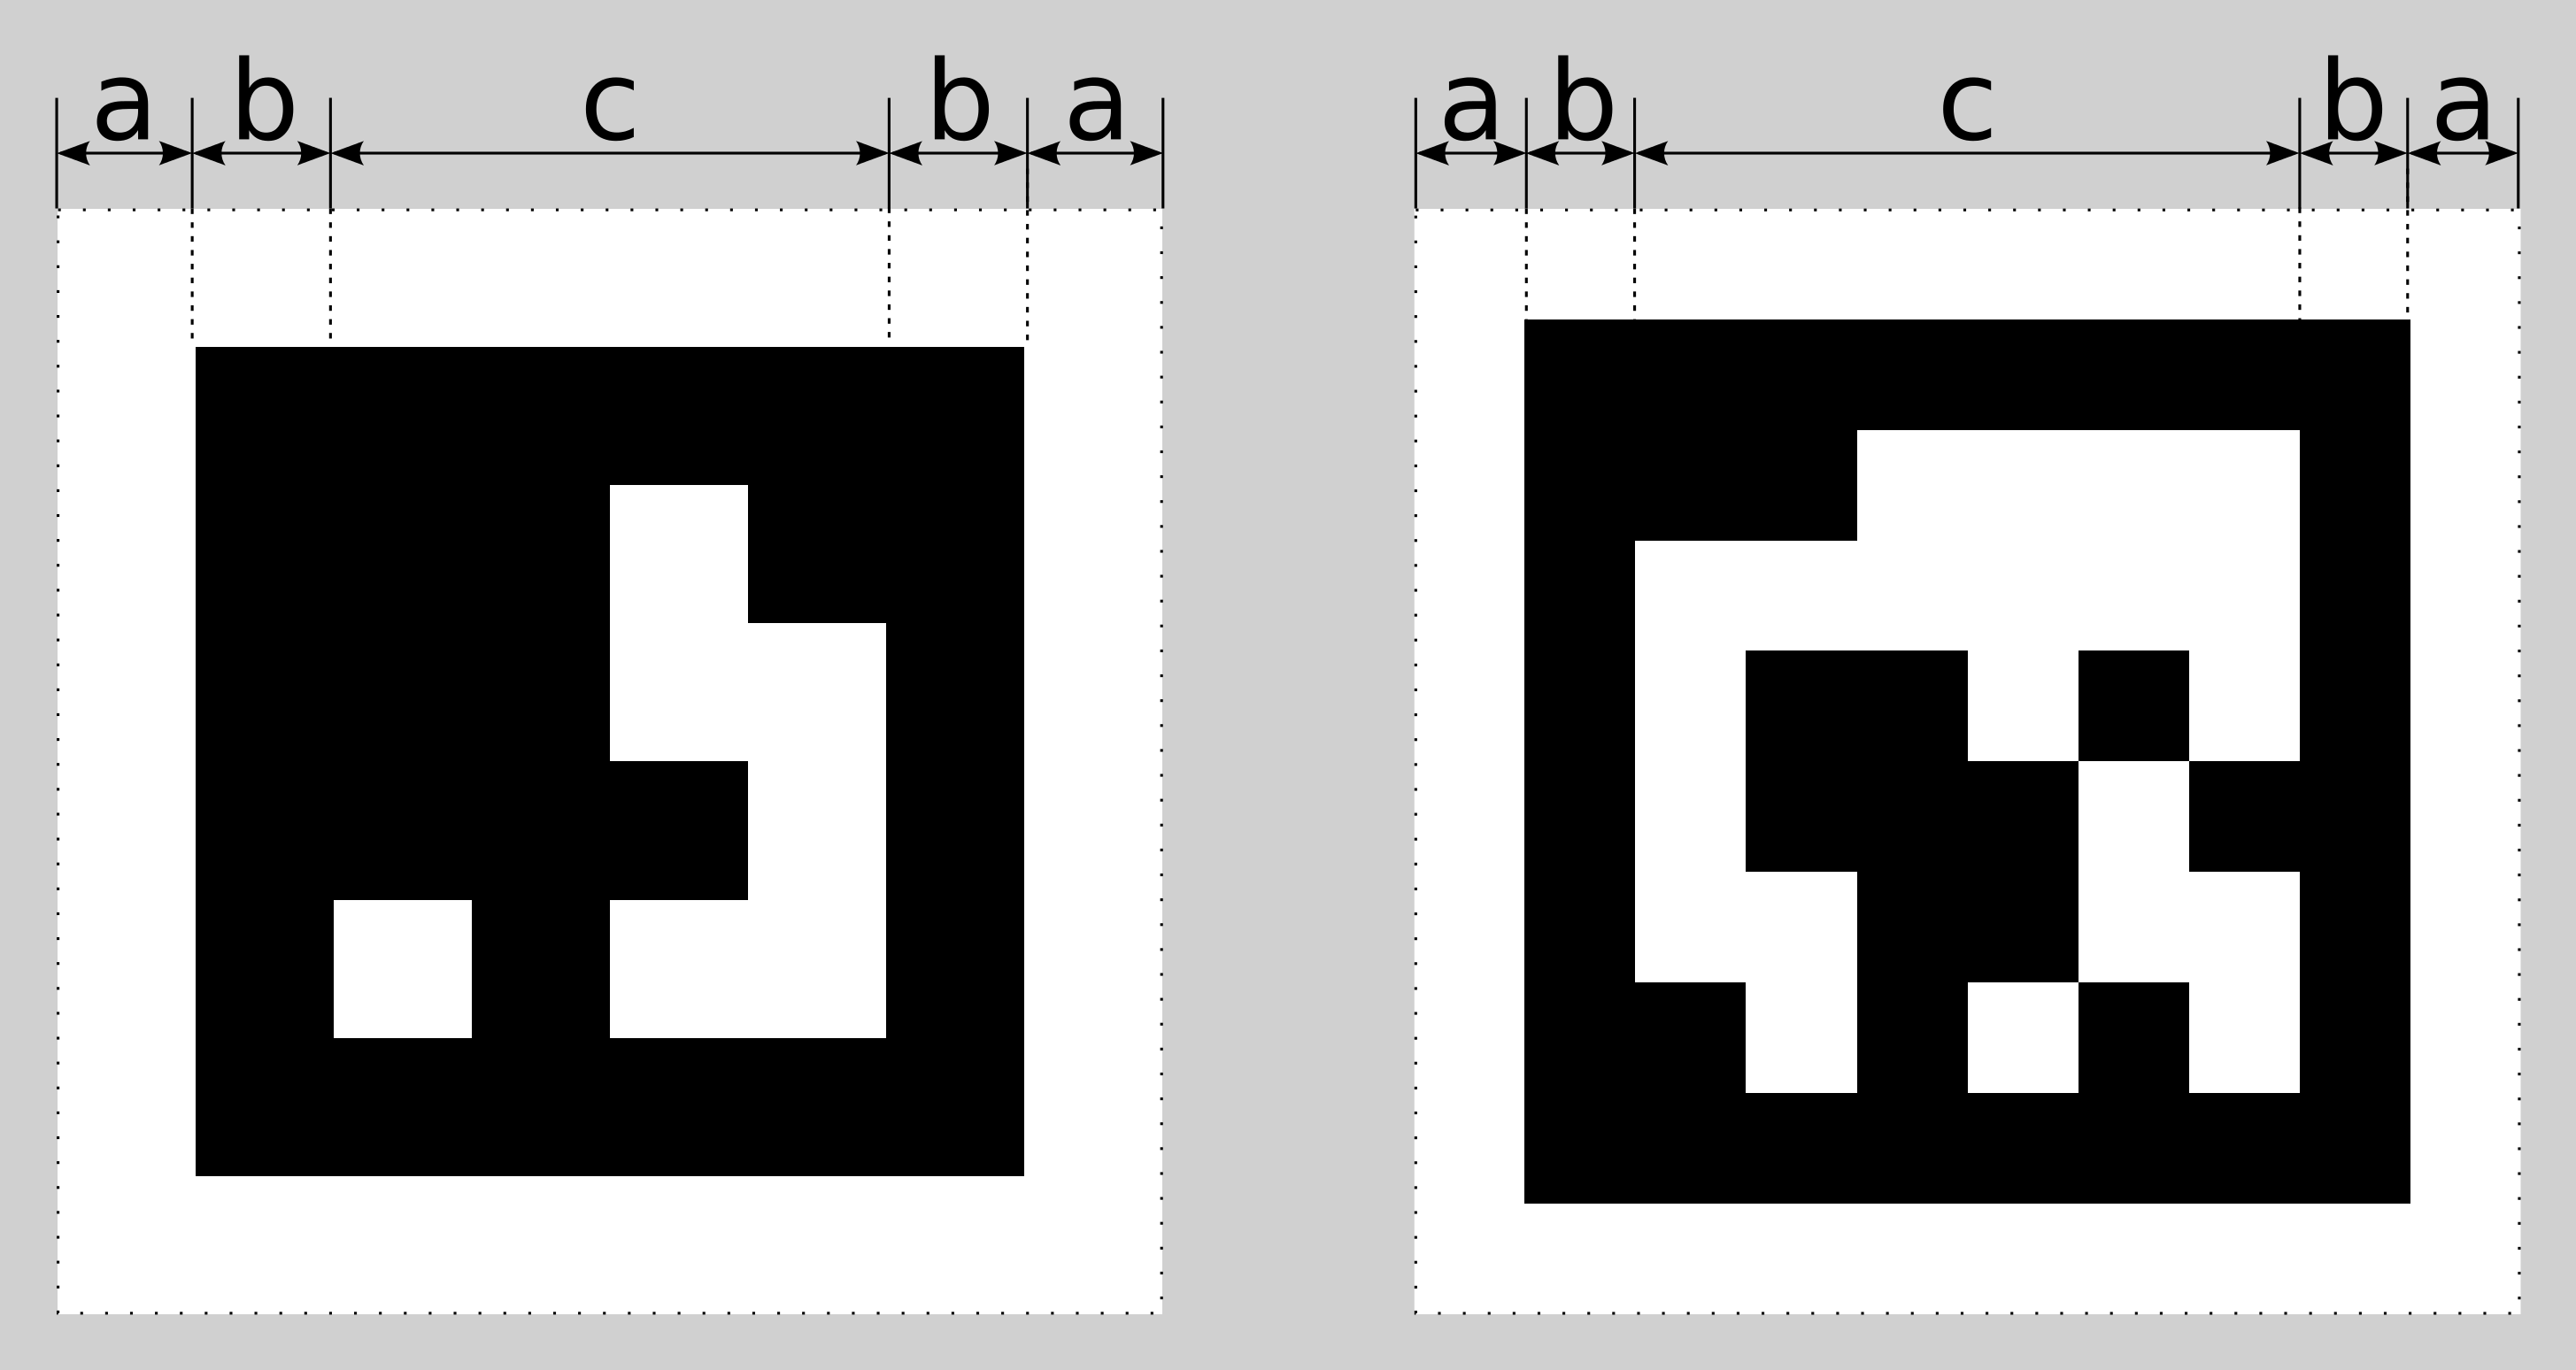
Fig. 24 A 16h5 tag (left) and a 36h11 tag (right). AprilTags consist of a mandatory white (a) and black (b) border and a variable amount of data bits (c).
AprilTags are similar to QR codes. However, they are specifically designed for robust identification at large distances. As for QR codes, we will call the tag pixels modules. Fig. 24 shows how AprilTags are structured. They are surrounded by a mandatory white and black border, each one module wide. In the center, they carry a variable amount of data modules. Other than QR codes, they do not contain any user-defined information but are identified by a predefined family and ID. The tags in Fig. 24 for example are of family 16h5 and 36h11 and have id 0 and 11, respectively. All supported families are shown in Table 14.
| Family | Number of tag IDs | Recommended |
|---|---|---|
| 16h5 | 30 | - |
| 25h7 | 242 | - |
| 25h9 | 35 | o |
| 36h10 | 2320 | o |
| 36h11 | 587 | + |
For each family, the number before the “h” states the number of data modules contained in the tag: While a 16h5 tag contains 16 (4x4) data modules ((c) in Fig. 24), a 36h11 tag contains 36 (6x6) modules. The number behind the “h” refers to the Hamming distance between two tags of the same family. The higher, the more robust is the detection, but the fewer individual tag IDs are available for the same number of data modules (see Table 14).
The advantage of fewer data modules (as for 16h5 compared to 36h11) is the lower resolution of the tag. Hence, each tag module is larger and the tag therefore can be detected from a larger distance. This, however, comes at a price: Firstly, fewer data modules lead to fewer individual tag IDs. Secondly, and more importantly, detection robustness is significantly reduced due to a higher false positive rate; i.e, tags are mixed up or nonexistent tags are detected in random image texture or noise.
For these reasons we recommend using the 36h11 family and highly discourage the use of the 16h5 and 25h7 families. The latter families should only be used if a large detection distance really is necessary for an application. However, the maximum detection distance increases only by approximately 25% when using a 16h5 tag instead of a 36h11 tag.
Pre-generated AprilTags can be downloaded at the AprilTag project website (https://april.eecs.umich.edu/software/apriltag.html). There, each family consists of multiple PNGs containing single tags and one PDF containing each tag on a separate page. Each pixel in the PNGs corresponds to one AprilTag module. When printing the tags, special care must be taken to also include the white border around the tag that is contained in the PNGs as well as PDFs (see (a) in Fig. 24). Moreover, the tags should be scaled to the desired printing size without any interpolation, so that the sharp edges are preserved.
Comparison
Both QR codes and AprilTags have their up and down sides. While QR codes allow arbitrary user-defined data to be stored, AprilTags have a pre-defined and limited set of tags. On the other hand, AprilTags have a lower resolution and can therefore be detected at larger distances. Moreover, the continuous white to black edge around AprilTags allow for more precise pose estimation.
Note
If user-defined data is not required, AprilTags should be preferred over QR codes.
Tag reading
The first step in the tag detection pipeline is reading the tags on the
2D image pair.
This step takes most of the processing time and its precision is crucial
for the precision of the resulting tag pose.
To control the speed of this step, the quality parameter
can be set by the user.
It results in a downscaling of the image pair before reading the tags.
High yields the largest maximum detection distance and highest
precision, but also the highest processing time.
Low results in the smallest maximum detection distance and
lowest precision, but processing requires less than half of the time.
Medium lies in between.
Please note that this quality parameter has no relation to the quality
parameter of
Stereo matching.
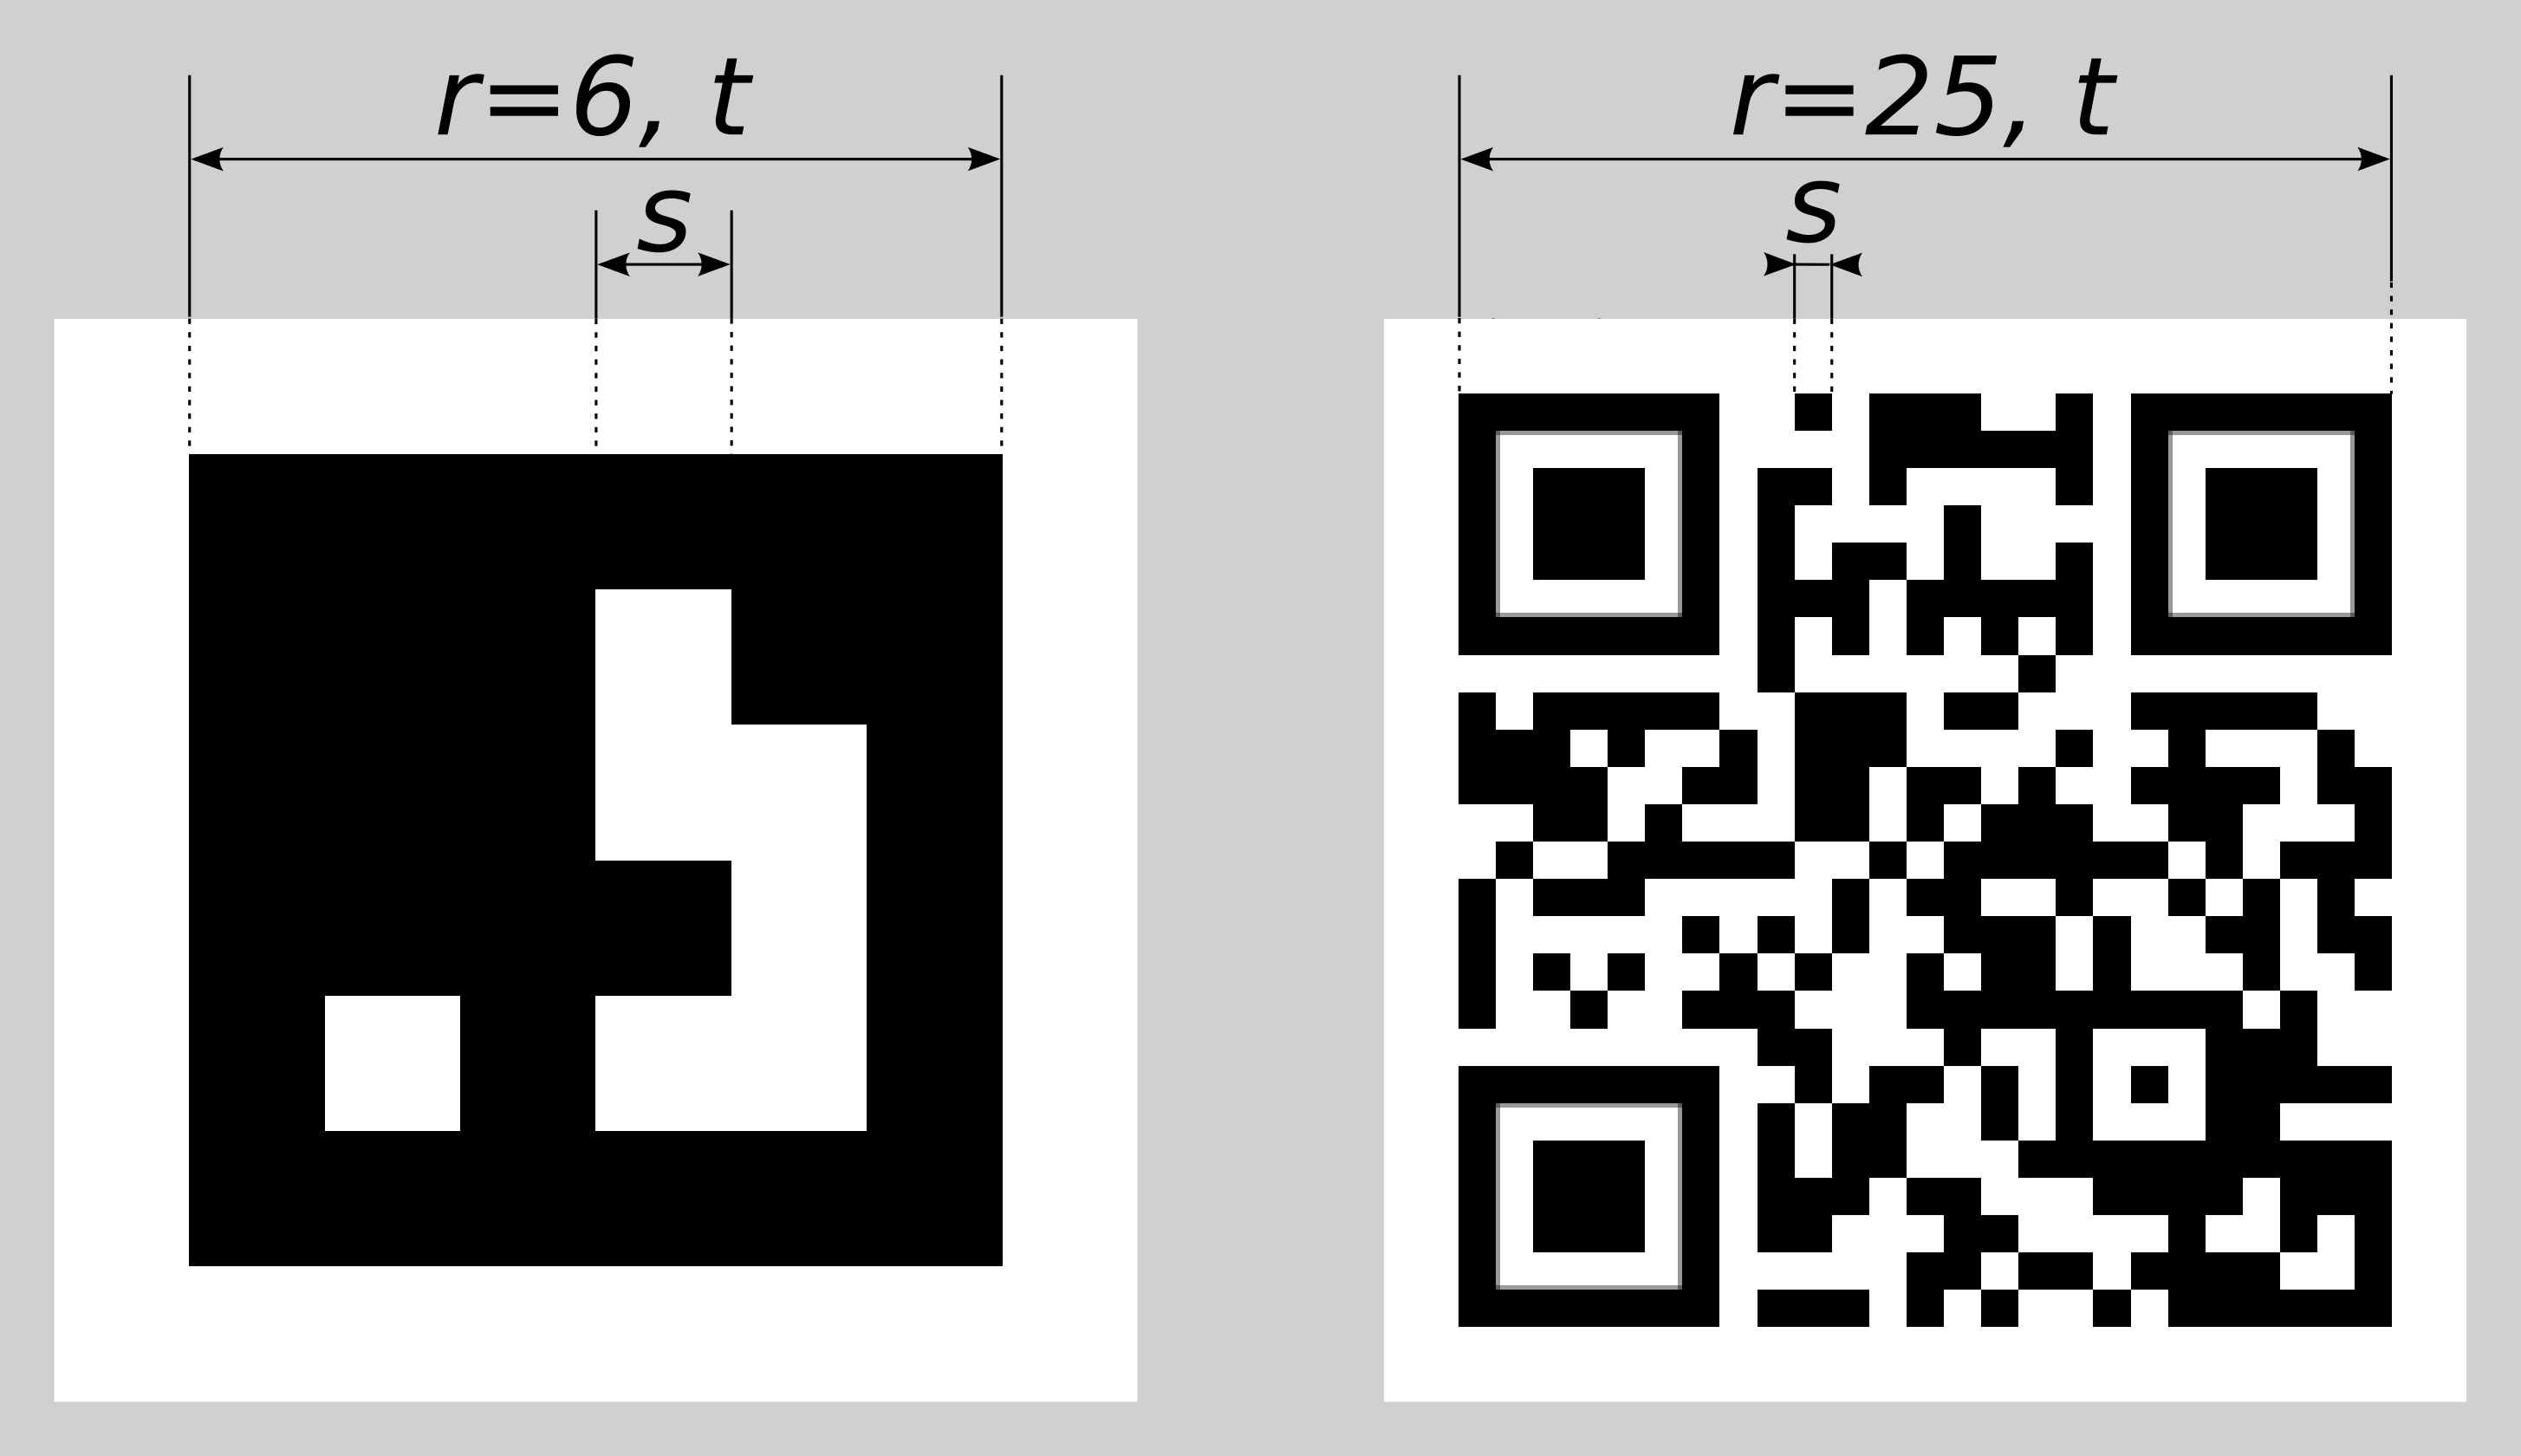
Fig. 25 Visualization of module size \(s\), size of a tag in modules \(r\), and size of a tag in meters \(t\) for AprilTags (left) and QR codes (right)
The maximum detection distance \(z\) at quality High can be
approximated by using the following formulae,
where \(f\) is the focal length in pixels and \(s\) is the size of a module in meters. \(s\) can easily be calculated by the latter formula, where \(t\) is the size of the tag in meters and \(r\) is the width of the code in modules (for AprilTags without the white border). Fig. 25 visualizes these variables. \(p\) denotes the number of image pixels per module required for detection. It is different for QR codes and AprilTags. Moreover, it varies with the tag’s angle to the camera and illumination. Approximate values for robust detection are:
- AprilTag: \(p=5\) pixels/module
- QR code: \(p=6\) pixels/module
The following tables give sample maximum distances for
different situations, assuming a focal length of
1075 pixels and the parameter quality to be set to High.
| AprilTag family | Tag width | Maximum distance |
|---|---|---|
| 36h11 (recommended) | 8 modules | 1.1 m |
| 16h5 | 6 modules | 1.4 m |
| Tag width | Maximum distance |
|---|---|
| 29 modules | 0.49 m |
| 21 modules | 0.70 m |
Pose estimation
For each detected tag, the pose of this tag in the camera coordinate frame is estimated. A requirement for pose estimation is that a tag is fully visible in the left and right camera image. The coordinate frame of the tag is aligned as shown below.
Fig. 26 Coordinate frames of AprilTags (left) and QR codes (right)
The z-axis is pointing “into” the tag. Please note that for AprilTags, although having the white border included in their definition, the coordinate system’s origin is placed exactly at the transition from the white to the black border. Since AprilTags do not have an obvious orientation, the origin is defined as the upper left corner in the orientation they are pre-generated in.
During pose estimation, the tag’s size is also estimated, while assuming the tag to be square. For QR codes, the size covers the full tag. For AprilTags, the size covers only the black part of the tag, hence ignoring the outermost white border.
The user can also specify the approximate size (\(\pm 10\%\)) of tags with a specific ID. All tags not matching this size contraint are automatically filtered out. This information is further used to resolve ambiguities in pose estimation that may arise if multiple tags with the same ID are visible in the left and right image and these tags are aligned in parallel to the image rows.
Note
For best pose estimation results one should make sure to accurately print the tag and to attach it to a rigid and as planar as possible surface. Any distortion of the tag or bump in the surface will degrade the estimated pose.
Warning
It is highly recommended to set the approximate size of a tag. Otherwise, if multiple tags with the same ID are visible in the left or right image, pose estimation may compute a wrong pose if these tags have the same orientation and are approximately aligned in parallel to the image rows. However, even if the approximate size is not given, the TagDetect components try to detect such situations and filter out affected tags.
Below tables give approximate precisions of the estimated poses of AprilTags and
QR codes.
We distinguish between lateral precision (i.e., in x and y direction) and
precision in z direction.
It is assumed that quality is set to High and that the camera’s
viewing direction is roughly parallel to the tag’s normal.
The size of a tag does not have a significant effect on the lateral or z
precision; however, in general, larger tags improve precision.
With respect to precision of the orientation especially around the x and y
axes, larger tags clearly outperform smaller ones.
| Distance | rc_visard 65 - lateral | rc_visard 65 - z | rc_visard 160 - lateral | rc_visard 160 - z |
|---|---|---|---|---|
| 0.3 m | 0.4 mm | 0.9 mm | 0.4 mm | 0.8 mm |
| 1.0 m | 0.7 mm | 3.3 mm | 0.7 mm | 3.3 mm |
| Distance | rc_visard 65 - lateral | rc_visard 65 - z | rc_visard 160 - lateral | rc_visard 160 - z |
|---|---|---|---|---|
| 0.3 m | 0.6 mm | 2.0 mm | 0.6 mm | 1.3 mm |
| 1.0 m | 2.6 mm | 15 mm | 2.6 mm | 7.9 mm |
Tag re-identification
Each tag has an ID; for AprilTags it is the family plus tag ID, for QR codes it is the contained data. However, these IDs are not unique, since the same tag may appear multiple times in a scene.
For distinction of these tags, the TagDetect components also assign each detected tag a unique identifier. To help the user identifying an identical tag over multiple detections, tag detection tries to re-identify tags; if successful, a tag is assigned the same unique identifier again.
Tag re-identification compares the positions of the corners of the tags in the camera coordinate frame to find identical tags. Tags are assumed identical if they did not or only slightly move in that frame.
By setting the max_corner_distance
threshold, the user can specify how much a tag is allowed move in the static
coordinate frame between two detections to be considered identical.
This parameter defines the maximum distance between the corners of
two tags, which is shown in
Fig. 27.
The Euclidean distances of all four corresponding tag corners are computed in 3D.
If none of these distances exceeds the threshold, the tags are
considered identical.
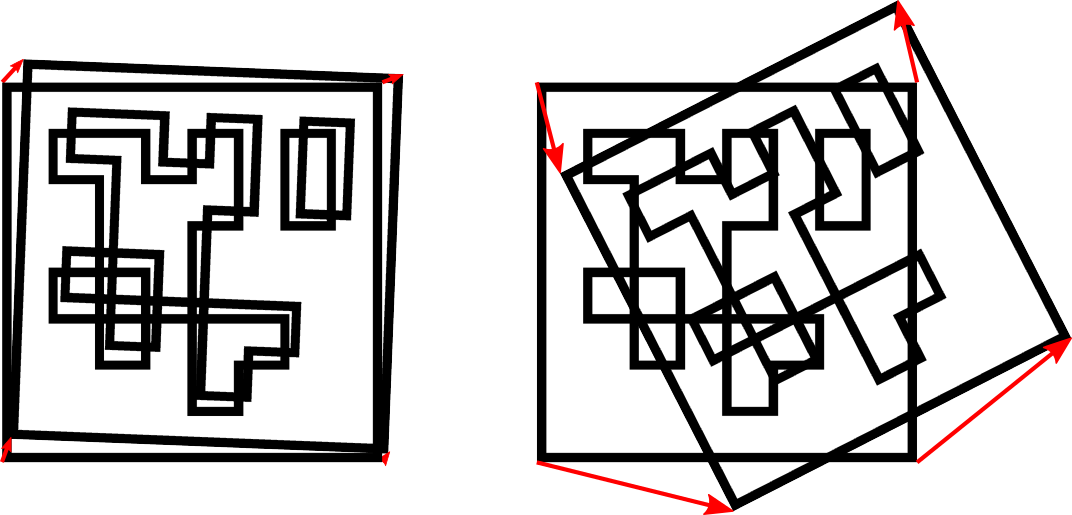
Fig. 27 Simplified visualization of tag re-identification. Euclidean distances between associated tag corners in 3D are compared (red arrows).
After a number of tag detection runs, previously detected tag instances
will be discarded if they are not detected in the meantime.
This can be configured by the parameter forget_after_n_detections.
Hand-eye calibration
In case the rc_visard has been calibrated to a robot, the TagDetect component
can automatically provide poses in the robot coordinate frame.
For the TagDetect node’s Services, the frame of the
output poses can be controlled with the pose_frame argument.
Two different pose_frame values can be chosen:
- Camera frame (
camera). All poses provided by the component are in the camera frame. - External frame (
external). All poses provided by the component are in the external frame, configured by the user during the hand-eye calibration process. The component relies on the on-board Hand-eye calibration component to retrieve the sensor mounting (static or robot mounted) and the hand-eye transformation. If the sensor mounting is static, no further information is needed. If the sensor is robot-mounted, therobot_poseis required to transform poses to and from theexternalframe.
All pose_frame values that are not camera or external are rejected.
Parameters
There are two separate components availabe for tag detection,
one for detecting AprilTags and one for QR codes, named
rc_april_tag_detect and rc_qr_code_detect, respectively.
Apart from the component names they share the same interface definition.
In addition to the REST-API interface, the TagDetect components provide tabs on the Web GUI, on which they can be tried out and configured manually.
In the following, the parameters are listed based on the
example of rc_qr_code_detect. They are the same for
rc_april_tag_detect.
This component offers the following run-time parameters:
| Name | Type | Min | Max | Default | Description |
|---|---|---|---|---|---|
detect_inverted_tags |
bool | false | true | false | Detect tags with black and white exchanged |
forget_after_n_detections |
int32 | 1 | 1000 | 30 | Number of detection runs after which to forget about a previous tag during tag re-identification |
max_corner_distance |
float64 | 0.001 | 0.01 | 0.005 | Maximum distance of corresponding tag corners in meters during tag re-identification |
quality |
string | - | - | High | Quality of tag detection (High, Medium or Low) |
use_cached_images |
bool | false | true | false | Use most recently received image pair instead of waiting for a new pair |
Status values
These TagDetect components reports the following status values:
| Name | Description |
|---|---|
data_acquisition_time |
Time in seconds required to acquire image pair |
last_timestamp_processed |
The timestamp of the last processed image pair |
state |
The current state of the node |
tag_detection_time |
Processing time of the last tag detection in seconds |
The reported state can take one of the following values.
| State name | Description |
|---|---|
| IDLE | The component is idle. |
| RUNNING | The component is running and ready for tag detection. |
| FATAL | A fatal error has occurred. |
Services
The TagDetect components implement a state machine for starting and stopping.
The actual tag detection can be triggered via detect.
start
starts the component by transitioning from
IDLEtoRUNNING.When running, the component receives images from the stereo camera and is ready to perform tag detections. To save computing resources, the component should only be running when necessary.
This service has no arguments.
The definition for the response with corresponding datatypes is:
{
  "accepted": "bool",
  "current_state": "string"
}
stop
stops the component by transitioning to
IDLE.This transition can be performed from state
RUNNINGandFATAL. All tag re-identification information is cleared during stopping.This service has no arguments.
The definition for the response with corresponding datatypes is:
{
  "accepted": "bool",
  "current_state": "string"
}
restart
restarts the component. If in
RUNNINGorFATAL, the component will be stopped and then started. If inIDLE, the component will be started.This service has no arguments.
The definition for the response with corresponding datatypes is:
{
  "accepted": "bool",
  "current_state": "string"
}
detect
triggers a tag detection. Depending on the
use_cached_imagesparameter, the component will use the latest received image pair (if set to true) or wait for a new pair that is captured after the service call was triggered (if set to false, this is the default). Even if set to true, tag detection will never use one image pair twice.It is recommended to call
detectin stateRUNNINGonly. It is also possible to be called in stateIDLE, resulting in an auto-start and stop of the component. This, however, has some drawbacks: First, the call will take considerably longer; second, tag re-identification will not work. It is therefore highly recommended to manually start the component before callingdetect.Request:
The definition for the request arguments with corresponding datatypes is:
{
  "pose_frame": "string",
  "robot_pose": {
    "orientation": {
      "w": "float64",
      "x": "float64",
      "y": "float64",
      "z": "float64"
    },
    "position": {
      "x": "float64",
      "y": "float64",
      "z": "float64"
    }
  },
  "tags": [
    {
      "id": "string",
      "size": "float64"
    }
  ]
}
Optional arguments:
tagsis the list of tag IDs that the TagDetect component should detect. For QR codes, the ID is the contained data. For AprilTags, it is “<family>_<id>”, so, e.g., for a tag of family 36h11 and ID 5, it is “36h11_5”. Naturally, the AprilTag component can only be triggered for AprilTags, and the QR code component only for QR codes.The
tagslist can also be left empty. In that case, all detected tags will be returned. This feature should be used only during development and debugging of an application. Whenever possible, the concrete tag IDs should be listed, on the one hand avoiding some false positives, on the other hand speeding up tag detection by filtering tags not of interest.For AprilTags, the user can not only specify concrete tags but also a complete family by setting the ID to “<family>”, so, e.g., “36h11”. All tags of this family will then be detected. It is further possible to specify multiple complete tag families or a combination of concrete tags and complete tag families; for instance, triggering for “36h11”, “25h9_3”, and “36h10” at the same time.
In addition to the ID, the approximate size (\(\pm 10\%\)) of a tag can be set with the
sizeparameter. As described in Pose estimation, this information helps to resolve ambiguities in pose estimation that may arise in certain situations.
pose_framecontrols whether the poses of the detected tags are returned in the camera or external frame, as detailed in Hand-eye calibration. The default iscamera.Response:
The definition for the response with corresponding datatypes is:
{
  "return_code": {
    "message": "string",
    "value": "int16"
  },
  "tags": [
    {
      "id": "string",
      "instance_id": "string",
      "pose": {
        "orientation": {
          "w": "float64",
          "x": "float64",
          "y": "float64",
          "z": "float64"
        },
        "position": {
          "x": "float64",
          "y": "float64",
          "z": "float64"
        }
      },
      "pose_frame": "string",
      "size": "float64",
      "timestamp": {
        "nsec": "int32",
        "sec": "int32"
      }
    }
  ],
  "timestamp": {
    "nsec": "int32",
    "sec": "int32"
  }
}
timestampis set to the timestamp of the image pair the tag detection ran on.
tagscontains all detected tags.
idis the ID of the tag, similar toidin the request.
instance_idis the random unique identifier of the tag assigned by tag re-identification.
posecontainspositionandorientation. The orientation is in quaternion format.
pose_frameis set to the coordinate frame above pose refers to. It will either be “camera” or “external”.
sizewill be set to the estimated tag size in meters; for AprilTags, the white border is not included.
return_codeholds possible warnings or error codes invalue, which are represented by a value greater than or less than 0, respectively. The respective error message can be found inmessage. The following table contains a list of common codes:
Code Description 0 Success -1 An invalid argument was provided -4 A timeout occurred while waiting for the image pair -9 The license is not valid -101 Internal error during tag detection -102 There was a backwards jump of system time -103 Internal error during tag pose estimation -200 A fatal internal error occurred 200 Multiple warnings occurred; see list in message201 The component was not in state RUNNINGTags might be omitted from the
detectresponse due to several reasons, e.g., if a tag is visible in only one of the cameras or if pose estimation did not succeed. These filtered-out tags are noted in the log, which can be accessed as described in Downloading log files.A visualization of the latest detection is shown on the Web GUI tabs of the TagDetect components. Please note that this visualization will only be shown after calling the detection service at least once. On the Web GUI, one can also manually try the detection by clicking the Detect button.
Due to changes in system time on the rc_cube there might occur jumps of timestamps, forward as well as backward (see Time synchronization). Forward jumps do not have an effect on the TagDetect component. Backward jumps, however, invalidate already received images. Therefore, in case a backwards time jump is detected, an error of value -102 will be issued on the next
detectcall, also to inform the user that the timestamps included in the response will jump back.
save_parameters
With this service call, the TagDetect component’s current parameter settings are persisted to the rc_cube. That is, these values are applied even after reboot.
This service has no arguments.
The definition for the response with corresponding datatypes is:
{
  "return_code": {
    "message": "string",
    "value": "int16"
  }
}
reset_defaults
Restores and applies the default values for this component’s parameters (“factory reset”) as given in the table above.
This service has no arguments.
The definition for the response with corresponding datatypes is:
{
  "return_code": {
    "message": "string",
    "value": "int16"
  }
}